What is Git?
Git is a Version Control System created by Linus Torvalds. Git is a ledger to save the history of files. Git helps developers to collaborate and track the changes in the code and to track the person who made the changes.
How Git is helpful?
- Manage projects with Repositories
- Clone a project to work on a local copy
- Control and track changes with Staging and Committing
- Branch and Merge to allow for work on different parts and versions of a project
- Pull the latest version of the project to a local copy
- Push local updates to the main project
Installation of Git
Git can be downloaded free of cost from git-scm.com/downloads as per your operating system. Once Git is downloaded it can easily be installed by following the setup instructions. If Git is already installed in your system, it’s probably a good idea to update to the latest version. Git can also be installed into your system by the command line.
Once Git is installed, you can check it by the following command:
git --version
The command will return the version of Git installed. If you don’t get any results it means Git is not properly installed. Along with Git, Git Bash is also installed on your computer where you can write your commands.
Git Configuration
The first time you install git you need to set up your user name and email id in the config file. This information is used by Git to track change history for specific users.
git config --global user.name "Your Name"
git config --global user.email "you@youremailid.com"
Change the user name and e-mail address to your own. We can check if the changes are successful or not by entering the following commands:
git config --global user.name
git config --global user.email
You can also make the changes directly to the config file.
Creating Git Repository
First, create a new folder using the mkdir command, Change the directory using cd and use the init command to convert it into a repository.
mkdir learninggit
cd learninggit
git init
Here, We created a Repository named learninggit.
Adding new files to Git Repository
Just create a new file in any programming language you prefer and place the file in the Git folder. You can check if the file is in the repo by the following command:
git status
Files in your Git repository folder can be in one of 2 states:
Tracked - files that Git knows about and are added to the repository
Untracked - files that are in your working directory, but not added to the repository
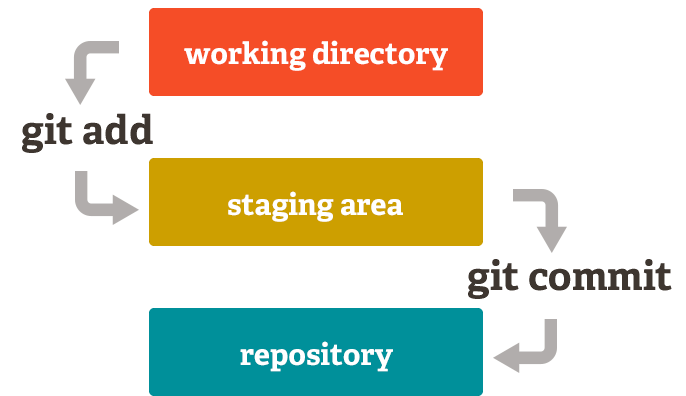
When you add a file to a repository, the file is untracked. To get Git to track them, you need to stage them or add them to the staging environment.
Git Staging

A staging environment is a state where you can hold your changes before committing them. Use the following command to add your file to a staging environment:
git add yourfilename
Staged files are files that are ready to be committed to the current working repository. You can add all the files present in the directory to the staging environment, using the command:
git add –all
Git Commit
Adding commits keep track of your progress and changes as we work. Git considers each commit change point or "save point". It is a point in the project you can go back to if you find a bug, or want to make a change.
Always include a message with the commit command.
git commit -m "My message"
To view the history of commits for a repository, you can use the log command:
git log
Git Commit without Staging
We can also skip the staging environment and commit the file directly. We can use the –a option along with commit command. The –a option will automatically stage every change.
git commit -a -m "file committed without staging"
Please share your feedback about the article. Also Checkout Part 2 Git Branching

